This guide covers the steps to follow if you want to change the Icons used for a Mobile App Component’s navigation menu.
The icons used to represent the content pages for the navigation menu on the App’s first page are based on Elusive Icons and can be changed to any other Elusive Icons icon and you can find the full list of over 300 available icons on this webpage. To change the icons you need to make changes in the HTML code. Don’t worry, just follow the steps in this guide on how to do it, but note that you need Developer Permission to do so.
1. Choose which Icon(s) to use
Go to the icon list on this webpage and select which Icons you want to use.

The ElusiveIcons Icon list page
2. Look up the Icon tag
Click on the icon you want to use in your App’s navigation menu. Look for the tag that we call el-tag. It’s the icon name that begins with the letters “el” so it’s easy to spot. For example, the el-tag for the calendar icon is “el-calendar”. Remember this el-tag as you will copy it into the HTML code later.

ElusiveIcons page for the Calendar Icon
3. Check which Navigation Menu style is in use
Go back to eMarketeer and check which Navigation Menu style you are using. The setting you want to check is named “Navigation Menu” and is located at the top of the settings tab for the Content block of the app as shown in the following image.

Navigation Menu setting location on the Content Settings tab
There are 3 Navigation Menu style options: Icons, Icon List, and List.
Note which one you are using as you only need to change the icons for that style in the following steps.
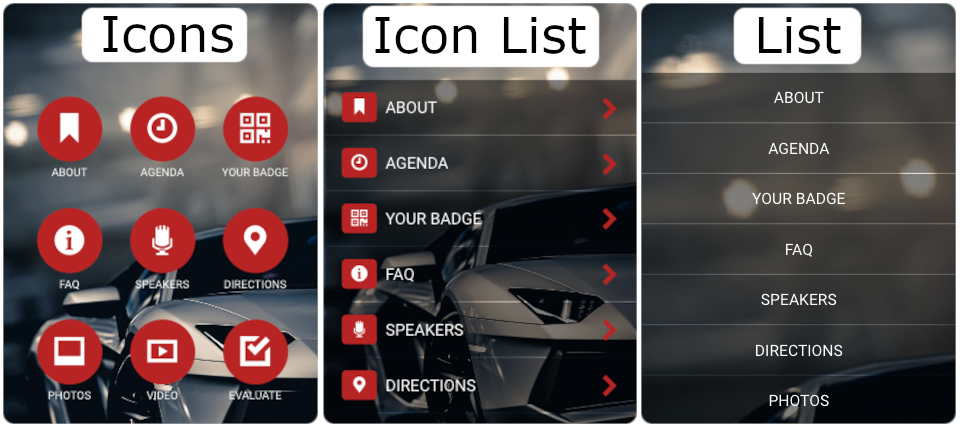
The 3 Navigation Menu Style options
4. Navigate to the HTML tab
While on the editing page for the Mobile App Component, click on [Enable Developer Mode] in the left-side Tools menu, open the [Colors, Fonts & Head] menu, and go to the [HTML] tab in the right-side menu as shown in the image below. If you don’t see the Developer Mode link then you need to get Developer Permissions for your user account from one of your company account administrators before you can proceed.

Navigating to the HTML tab in Developer Mode
5. Finding the Icon in the HTML
On the HTML tab there are two places where you change the icons that are used. The first place is for the Icons used if you use the “Icon List” navigation menu style and the second place is for the “Icons” navigation menu style.
The top level of the part of the HTML to change will either say that it is for the “iconlist” option or the “icons” option as shown in the images below.
Each of the navigation menu icons in the App has its own sub-part of the HTML under the iconlist or icon top level, and the part to change the icon for that part is the el-tag for the currently used ElusiveIcon, such as “el-time” or “el-bookmark” as highlighted in the attached images below.
Iconlist HTML image:

Location of the Iconlist icon code in the HTML (usually found close to line 113)
Icons HTML image:
Location of the Icons icon code in the HTML (usually found close to line 237)
5. Replace the icon tag and save the change
Change the current el-tag to the new el-tag for the icon you want to use and then save the HTML change. As an example using the icon shown earlier, to change the el-icon for “Company News” to use the calendar icon you would change the el-tag “el-bookmark” to the tag “el-calendar”. You do not need to change the surrounding tags as these are the same for all icons in the App Component (el, el-inverse, el-fw).