How to Set Up a Zap to Send Contact Data to eMarketeer as a Custom Signal
This guide will show you how to create a Zap that receives contact data (and more) from any source and sends it to eMarketeer as a custom signal. This setup will automatically create or update contacts in eMarketeer, along with any additional data you want to include, such as form responses.
Step 1: Create a New Zap
- Log in to your Zapier account and click on the “Create Zap” button.
- Name your Zap for easy reference.
 Step 2: Set Up the Trigger
- Choose a trigger app that contains the contact data you want to send to eMarketeer. For this example, we’ll use a Sleeknote form submission.
- Select the specific event that will trigger the Zap (e.g., “New Form Submission”).
- Connect your account and test the trigger to ensure the data is being captured correctly.
Step 3: Add the Webhook Action
- Click on “+ Add Action” and select “Webhooks by Zapier” as the action app.
- Choose “Custom Request” as the action event. This will allow you to send a custom API call to eMarketeer.
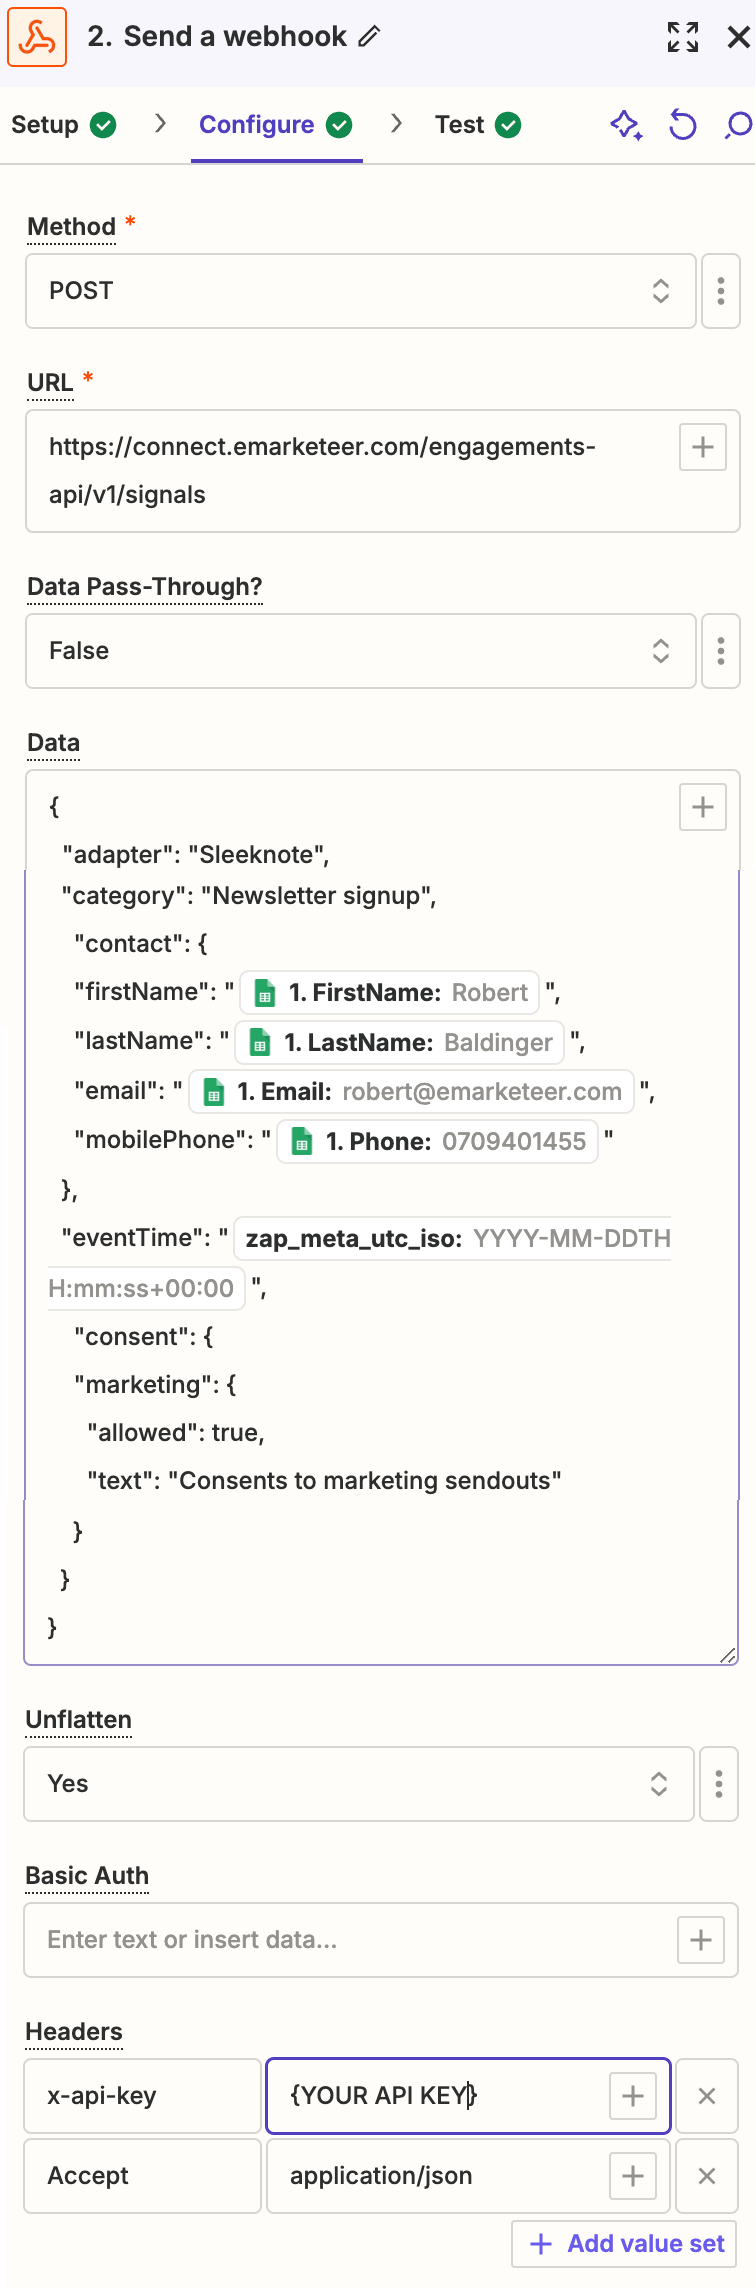
Step 4: Configure the Webhook
- In the Webhook Setup dialog, enter the following details:
- Method: POST
- URL: Use the Signals API endpoint from eMarketeer:
https://connect.emarketeer.com/engagements-api/v1/signals - Headers:
- Content-Type:
application/json - Authorization:
Bearer YOUR_API_KEY(replaceYOUR_API_KEYwith your actual API key)
- Content-Type:
- Payload Type: JSON
- In the Data section, enter the data you want to send in JSON format. Here’s an example template you can use:
{

"adapter": "Sleeknote",

"category": "Newsletter signup",

"contact": {

"firstName": "{{trigger_data_first_name}}",

"lastName": "{{trigger_data_last_name}}",

"email": "{{trigger_data_email}}",

"mobilePhone": "{{trigger_data_phone}}"

},

"eventTime": "{{zap_meta_utc_iso}}",

"consent": {

"marketing": {

"allowed": true,

"text": "Consents to marketing sendouts"

}

}

}
- Replace the placeholder values (e.g.,
{{trigger_data_first_name}}) with the corresponding fields from your trigger data, such as the contact’s first name, last name, email, and phone number.
- Replace the placeholder values (e.g.,
Step 5: Test the Webhook Action
- Click “Test & Review” to send a test payload to eMarketeer.
- Check eMarketeer to confirm that the contact was created or updated as expected, and that the custom signal was recorded correctly.
Step 6: Turn on Your Zap
- Once the test is successful, click “Turn on Zap” to activate it.
- Your Zap will now automatically send contact data to eMarketeer whenever the specified trigger occurs.
Additional Information:
- Adapter: This is the name of the signal source. It could be the name of the tool you’re using (e.g., Sleeknote, CRM, etc.).
- Category: This describes the type of data or action (e.g., “Newsletter signup”, “Sale closed”).
- Event Time: Use
{{zap_meta_utc_iso}}to capture the exact time the event occurred.
Recommended Use Cases:
You can use this Zap setup to send various types of engagement data to eMarketeer, such as form submissions, lead updates, or CRM activity. For form submissions specifically, we recommend using the Signals API as shown above.
For more details on the Signals API, please refer to the eMarketeer API Documentation.