The standard QR-code generator that is used for eMarketeer can dynamically give you any data from a contact’s contact card in the form of a QR-code that can be distributed to your contacts via an email or app component. This guide shows how to manipulate the QR-code generator to open a specific Form on your account where this data can be registered automatically via scanning the QR-code. This is a more advanced way of doing QR-codes and may require that you have some knowledge about HTML and URLs before starting.
What you need to start
First off you will need a Form component on your account where you will register the contacts that are attending the event. We will use the integration HTML from this Form to create the QR-code.
Secondly you will need the URL for the QR-code generation, the following string is that URL:
https://app.emarketeer.com/library/qrcode/php/qr_img.php?s=6&d=https://app.emarketeer.com/ext/form/receiver.php?m=M_VALUE%26NAME_VALUE=<% contact field="email" %>
This URL example is missing 2 values before it will work, the M-Value and the NAME-Value. These values are what you will need to get from the specific Form that you want the attendance registered in.
Getting the M-Value and NAME-Value from the Form
Start by going to the Form components Report page for the specific Form that you want the attendance registered in, then do the following to access the Form’s webpage integration code.

Guide to Form Integration Code
- Click on [Publish Form] in the left-side menu to access the publishing options.
- Click [Website Integration] on the publishing page.
- Under <FORM>, write any domain in the domain field and then click the ENTER key on your keyboard. For example, you can write “emarketeer.com” in this field.
- Click the button [Get Code]
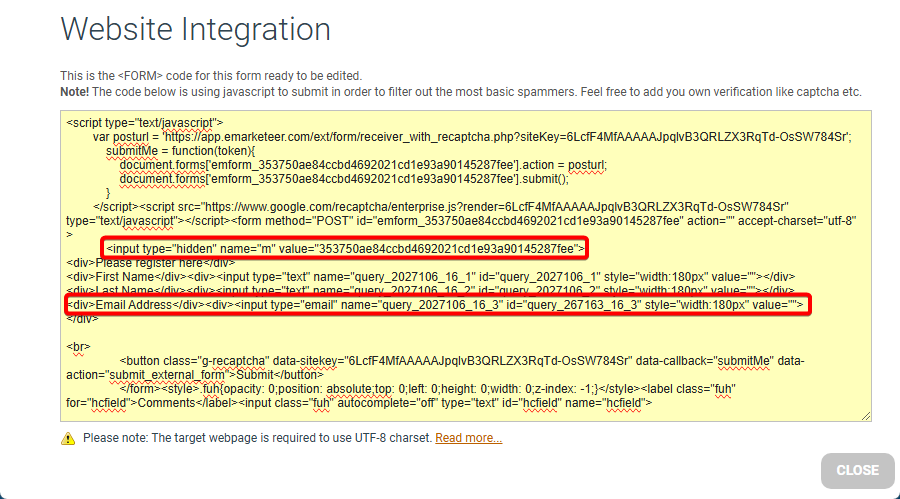
Next is getting the M-Value and the NAME-value you need from the website integration code, the M-Value is the identifier for the Form Component and the NAME-Value is the identifier for the specific Question. The question you want is the that corresponds to the contact’s email address, which will be used to identify the contact for registering attendance. What you will be looking for is the values for <input type=”hidden” name=”m” value=”M-Value”> and <input type=”email” name=”NAME-Value”>

The M-Value and NAME-Value
Examples of these values:
M-Value: “353750ae84ccbd4692021cd1e93a90145287fee”
NAME-value: “query_2027106_16_3”
Creating the QR-code URL
Now that you have the values you need from the specific Form that you want the attendance registered in, you will have to add them to the QR-code generation URL by replacing these parts in the example URL:
https://app.emarketeer.com/library/qrcode/php/qr_img.php?s=6&d=https://app.emarketeer.com/ext/form/receiver.php?m=M_VALUE%26NAME_VALUE=<% contact field="email" %>
After doing this you will end up with a URL that looks like this:
https://app.emarketeer.com/library/qrcode/php/qr_img.php?s=6&d=https://app.emarketeer.com/ext/form/receiver.php?m=353750ae84ccbd4692021cd1e93a90145287fee%26query_2027106_16_3=<% contact field="email" %>
Using the QR-code URL
This QR-code URL can now be put into an image block in an Email or App component as if it was an image URL. When the email or app is distributed, each individual contact will get a unique QR-code that contains their email address for identification and when scanned it will register them to the Form component.
For use on an App component’s QR-code page you will need Developer permissions for you User account and then start Developer Mode on the App’s editing page. From here you will have to open the QR-code block, go to the HTML tab, and then replace the standard QR-code URL in the HTML with the new one you have created.