This short guide describes how to import contacts to your eMarketeer contact database from Excel documents.
Preparations
- Make sure that your Excel file is structured in a way that lists data of a specific type in the same column, and each contact on a new row.
- All contacts need to have valid email addresses or else they will not be imported. Even when importing contacts for SMS sendouts!
- eMarketeer uses First name data and Last name data as two separate fields (full name is not supported), make sure the Excel file reflects this.
- If you intend to updated Legal Basis (consent infromation) as a part of the import, make sure that all contacts in the file is of the same Legal Basis.
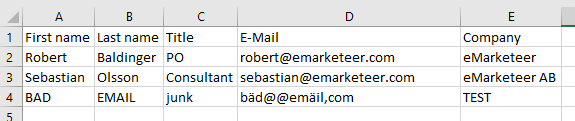
Example of an Excel file with 3 contacts
Where to import?
At this point you should have an Excel file ready to go. But where do you perform the import, and why? Ultimately you import contacts because you want to communicate with them. Most likely you want to make a specific email sendout to these contacts. But do you want to send them out immediately or do you want to store these contacts for later?
Import as a recipient Source
When sending emails you may choose one or multiple sources for your recipients. One such source is the “File upload” option. This allows you to import contacts from an Excel file (or text file) to be used as recipients in your email send out. This is an efficient way to quickly use all contacts in an Excel file as your recipients without the need of having to create a contact list.
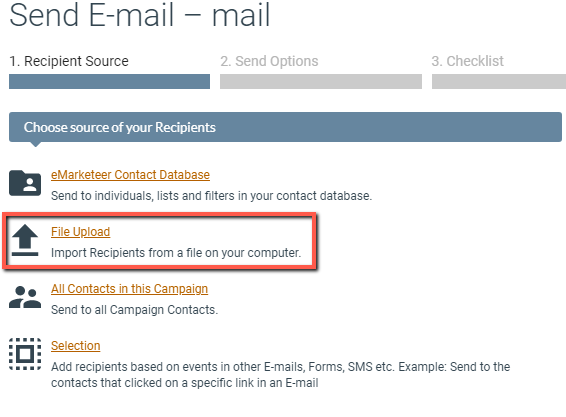
File upload option when sending an email.
Importing to a campaign
If you want to prepare your campaign ahead of sending you may import the contacts straight to the Campaign Contacts list. You can then later use the “All Contacts in this Campaign” option to address this selection of contacts. Do note that the Campaign Contacts list is updated dynamically as new contacts interact with the campaign, so there may in some cases be additional contacts other than those that originate from the Excel file when you address this source. This option is suitable in cases where you either have an empty campaign that you want to prep with contacts ahead of time, or if you want to add into an existing Campaign Contact list. It is not suitable for campaigns that have multiple purposes or types of recipients.

Import contacts option in a campaign.
Importing to a Contact List
If you intend for the contacts in your Excel file to be used multiple times it could be benefitial to add them to a Contact List. This makes it so that you can address the contacts multiple times in various different sendouts without the need for importing the contacts every time. Contact Lists are commonly used for Newsletter subscription lists or other useful scenarios such as lists of internal contacts, or a test group for draft emails.
If you need to create a new Contact List as a destination for your import then this guide shows you how to do it.
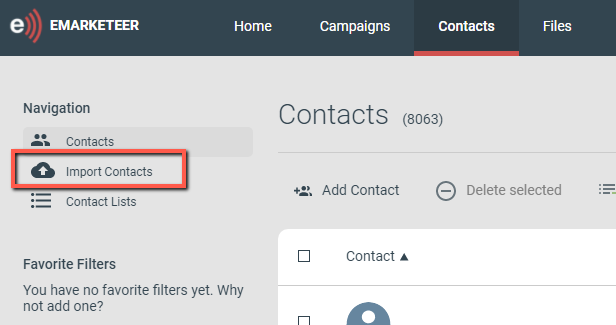
Import Contacts option in the Contacts tab.
Importing & Field mapping
When you’ve chosen the method of import the next step is to perform the actual import. To do so, choose “File Upload” and to import an “Excel File”.
In the next step you will be prompted with this view. This view contains instructions on how to proceed.
- Open Your Excel file.
- Select the cells you want to import and “copy”.
- Paste the copied cells in the empty text area.
- Click “Next”.
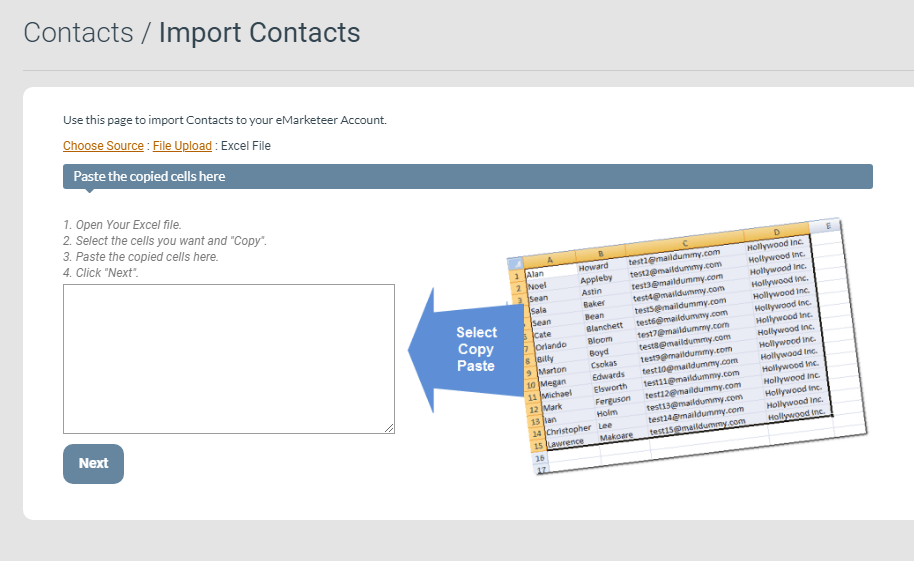
An empty text area
Field Mapping
In the next step you will be asked to select the columns you wish to import. The default setting is “Do not import” unless the value on the first row of each column matches a value in the drop down menu (if it does it will be pre selected). If you wish to import the data of a specific column, select an option in the drop down menu that corresponds to that column’s data type. E.g. the column that contains email addresses should be set to “E-Mail”.

Matching the column with the eMarketeer contact fields
Import options
By default a matching will occurr on email address. Meaning that if a matchig email address is found, the matching contact will be updated with the new information. And if no match is found, a new contact will be created. You can also choose to match on External ID if one of your data columns is of that data type. This will update contacts with a matching External ID with new information (good if you want to update email address), if no match is found a new contact is created.
If the import is performed under “Contacts”, you may also choose to import the contacts to an existing Contact List, using the “Import to List” option.

Import options
Legal Basis
Lastly you may also choose to update the Legal Basis for the contacts of your file. As this will create or update the Legal Basis for all contacts imported it is important that you select an option that is reflective of your actual legal basis (for the specific purposes) of each individual of your contact import. Read more about how consent here.
Do note that a withdrawn consent will not be updated by a contact import, which means that you cannot revoke the withdrawal of a consent using a contact import.

Example of how to set “Consent” as the Legal Basis for each Purpose.
When ready, click “Import Contacts” to start the import. Depending on your how many contacts you import and how many columns, the time it takes to complete will vary. A small list of a couple of hundred contacts and a handful of columns should typically take a few seconds, while larger lists will take longer. During the import there will be a progress bar.
After the import has completed the results of the import will be shown. It will tell you how many contacts that were updated, created and skipped due to various reasons. If the import did not yeild the expected results, this report can be of great use to help you understand the nature of the problem. Contacts with invalid email addresses will be shown in the “Bad e-mail addresses” text area (visible after clicking “Show list”). You can easily copy the text from this box and paste it into another excel document for review.
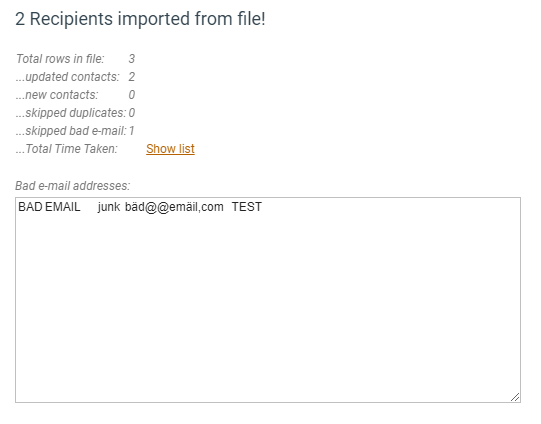
Results of the import