During the process of sending an Email your intended recipient contacts are verified during the Checklist step, where some are Blocked from being addressed in the email sendout. There are several reasons why a contact may be removed from the sendout but the least understood reason is Undeliverable Email Address, and we regularly get asked how one can get a list of these contacts to review and manage. This guide is intended to answer those questions and provide a step-by-step guide to create a list of these contacts.
What is an Undeliverable Email Address and how are they identified?
An undeliverable email address is, in short, an address that cannot receive emails due to some delivery issue. eMarketeer blocks emails from being sent to these addresses to protect the account’s Sender Reputation, which is a metric used by most email services to separate spam emails from legitimate emails. An email address is marked as Undeliverable if it previously has “Bounced” with a permanent delivery error, which is shown in the email report and on the contact card of the contact. You can read more about Bounces, Sender Reputation, and how eMarketeer protects your sendouts in this article.
Most addresses blocked by the checklist stage due to being undeliverable is because of the scenario above, but it also does another type of check for this which won’t show up on the affected contact’s contact card. This check of undeliverable addresses is an active verification of the recipient contact’s email service’s ability to receive emails at the time of sending by checking if it is active. If the recipient’s email service is down, then the contacts with addresses using that service will be counted as undeliverable in the checklist report, but it won’t be permanently recorded on their contact card as such service outages usually only are temporary. This means that the contact most likely will get the next email you try to send them, but also that we won’t be able to include them in the list we create using the guide in this article.
How to create a list of contacts with Undeliverable Email Addresses of the contacts identified in the Checklist
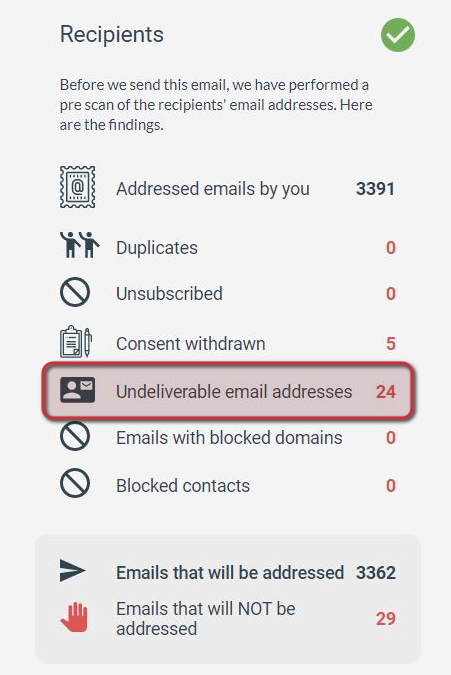
Starting from the Checklist page where you identify that there are some contacts with undeliverable addresses that you want to get a list of, assuming you already have a list of all of your intended recipients there are only a few steps to get a list of only these contacts.

Undeliverable Count as seen on Checklist
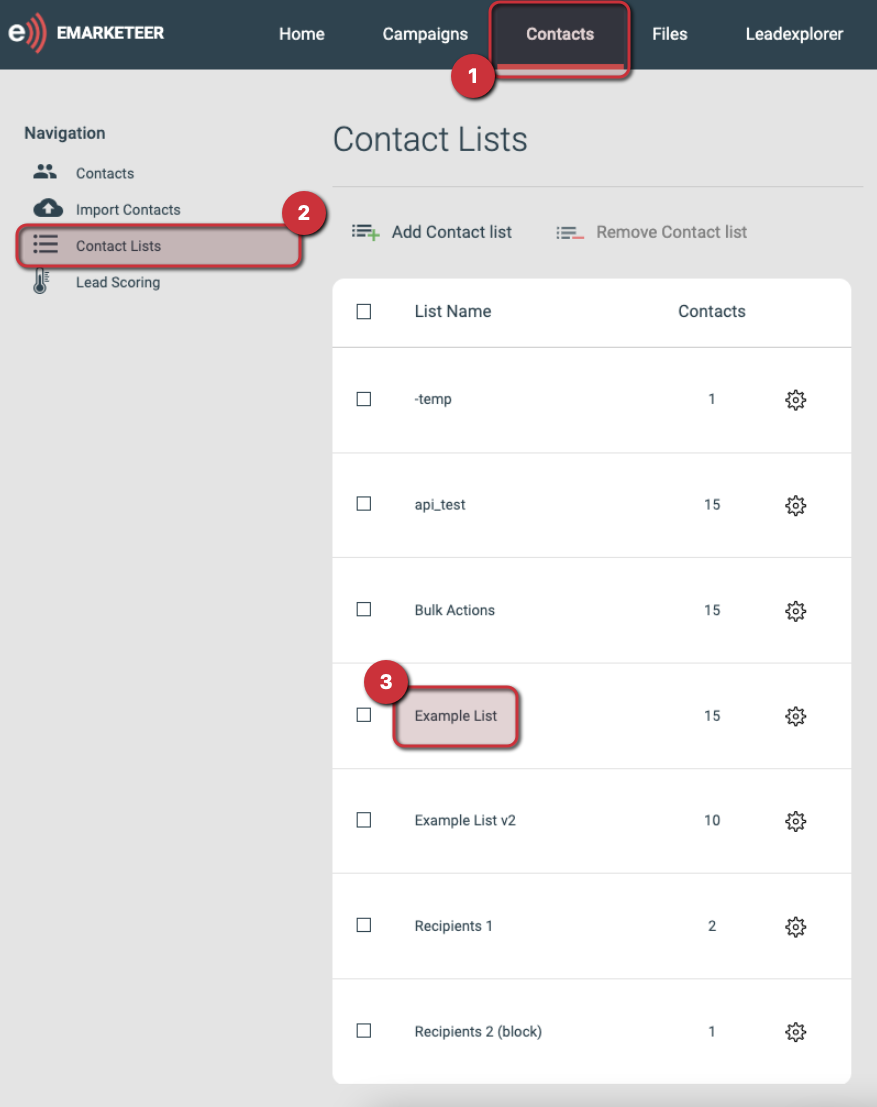
1. Navigate to the Contacts page for the eMarketeer Account.
2. Navigate to the Contact Lists on the account using the menu on the left.
- If you don’t have a contact list with the recipients, select Import instead of Contact Lists in the menu and create a contact list, then navigate to the Contact Lists page.
- If you instead want to check all Undeliveable contacts on your account and not only the ones identified in a checklist, skip ahead to step 4.
3. Navigate to the contact list containing the recipients.

Navigating to the Contact List
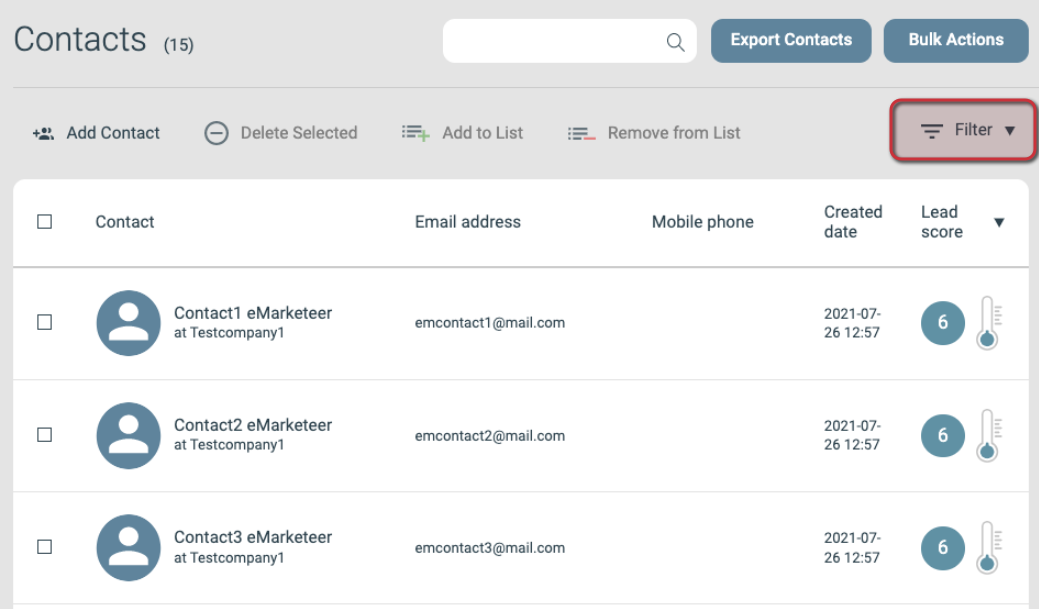
4. Click on the Filter button to open the filter feature

Filter Button Location on the Contacts page
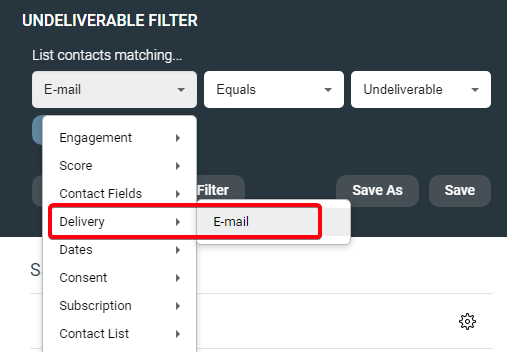
5. Use the following filter parameters to only show the contacts with Undeliverable Email Addresses
[Delivery: E-mail > Equals > Undeliverable]

Parameters for a Filter listing Contacts with Undeliverable Email Addresses
6. Apply the filter to create your list
The resulting list of contacts will be the recipients with Undeliverable Email Addresses you saw on the Checklist page during the sendout process.
At this point, you can do a few things with the contacts, such as the following.
- Investigate individual contact card’s engagement logs for the last email sent to the contact to see the specific delivery error message that marked them Undeliverable.
- Export a spreadsheet text file of the contacts.
- If you need the contacts’ Undeliverable status lifted then you can export their Email addresses (separated by commas) and sent the resulting file to the Support at support@emarketeer.com for help with this.
- Alternatively, if you have a CRM integration on your account such as the one with SuperOffice, then you can export the contacts to a list on that CRM.
- Use the Bulk Actions tool to manage the contacts.
- There are several options hen using this tool, one example being ‘Add to Contact List’ which could be used to create a permanent list with these contacts in case you want to refer back to them at a later date.
Thank you for reading this article, if you still have questions about this then please get in touch with the support via the appropriate channels as found on this page when logged in to your account.