The following article describes the features of the Campaign interface with a specific focus on the Components view.
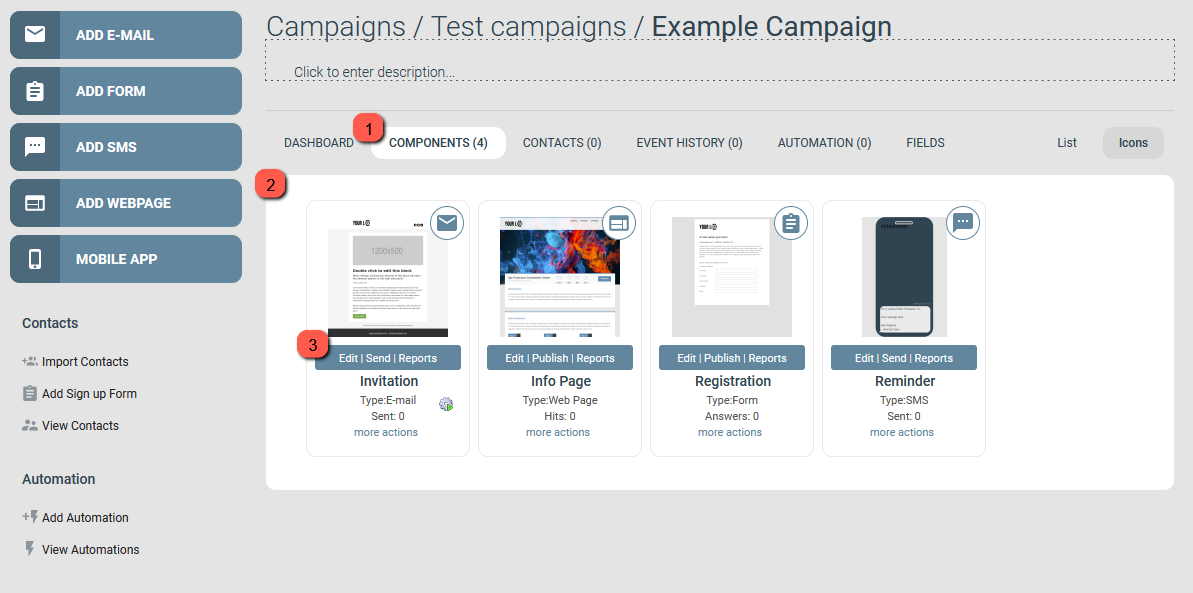
On the left hand side there is a menu with buttons to add components to your campaign (Add components menu). Components makes up the actual content of your campaign. There are four different types of components: Emails, Forms, SMS and Webpages, and one sub component: Mobile apps. In addition to the Add components menu, quick links to common campaign actions related to contact management and automations can be found.
On the right hand side you find the area containing the multiple views of the campaign.
The campaign user interface
1. Campaign views
Below the Campaign path, name and description there are multiple tabs. These tabs contain the different views of the Campaign. Each view has its own specific purpose and are described breifly below:
- Dashboard
Enables you to build campaign specific reports using various reporting widgets. More information can be found here. - Components
The default view. Lets you organize and view the campaign’s components. Basically here’s where you build the bulk of the content matter of the campaign. The number within parenthesis show the number of components in the campaign. - Contacts
This view shows a lists of contacts that have been added to the campaign, either by importing the contacts to the campaign directly or automatically by the specific contacts having interacted with the campaign in any way (meaning this list is by default automatically populated). The number within parenthesis show the number of contacts currently related to the campaign. Read more. - Event history
Shows events related to sent emails or sms. Here you may review when a specific component was sent as well as review and or abort upcoming scheduled emails or sms. The number within parenthesis show the number of scheduled sendouts currently waiting to be sent from this campaign. - Automation
This view lets you add automated actions to the campaign. In order to add automations you need to have at least to have a single component in the campaign as automations can only be triggered by events originating from a contact interacting with a component (such as a contact submitting a form etc). The number within parenthesis show the number of created automations in the campaign. - Fields
This section lets you define fields that are unique to this campaign and that can be merged into the content of your components as field variables. Editing the field value would then replace the corresponding variable in each component where it was used. Read more about Campaign fields here.
2. View specific area
The unique interface of each view is shown in this area with the white background. In the screenshot the Component view is shown.
3. Components view
In the Component view the components are shown as either thumbnails or as a list. This can be controlled by choosing either “List” or “Icons” in the top right corner above the components view. This guide focuses on the default “Icons” setting. Component thumbnails are not displayed in any particular order but can be organized by drag and drop for an easier overview. Double clicking a component thumbnail will open the component editor.
Under the thumbnail image of each component exists a menu with the Edit, Send/Publish and Reports options. These are the main sections of each component.
- Edit
Opens the component editor where you edit the content of the component. - Send
Opens the Send options page. This lets you send or schedule a component (only available for email and sms). - Publish
Opens the Publish options page. This page contains the direct url of the component as well as other publishing options depending on the component type (only available for forms and webpages). - Reports
Opens the component report. Each component have unique reports with different metrics depending on the type.
Under the main component menu there is an area with additional information about the component, such as clarification of which type of component it is and metrics of how much the component has been used/interacted with. Below this information there’s the “more actions” menu.
More actions menu
This menu provides options for managing the component.
- Delete
The component is deleted from the campaign. Deleting ta component removes the report and all connected statistics about the specific component. Contact interaction with the component will be removed from the contact Engagement timeline. - Rename
The user may rename the component. Do note that the name is only visible to eMarketeer users and will not how contacts view the component. - Copy
A copy of the component is created in the campaign with the name “Copy of [component name]”. The copy comes with a clean report but is otherwise identical to the original. - Move
The component may be moved to another campaign of your choice. Do note that if the component uses internal links to components in the source campaign those links may become broken in the new campaign. - Make template
Creates a copy of the campaign as a component template, available in the “Add components menu”. The template will be listed under the tab “My templates”, which lists all saved templates on your account.